Do you love to travel? Do you love to get travel tips? Then join our closed Facebook group, The Ethel-On-The-Go, today!
As a certified yoga teacher of 14 years who does one-on-one classes in private homes, I know firsthand that many women, particularly in their older years, love to practice alone, away from a crowded class. Here, I include four poses that promote physical health, mental clarity and a sense of harmony.
As spring is unfolding, consider practicing these poses in a tranquil garden, on a shaded patio or even by a window overlooking a blossoming landscape.
As you practice, focus on breathing softly and slowly, making your exhales a little longer than your inhales. As with all exercises, if you have health conditions, check with your doctor to confirm yoga is for you.
What You’ll Need:
Yoga Mat
Two Yoga Blocks (or soft, supportive pillows)
Timer (set to three minutes)
Small Blanket
Favorite Music (optional)
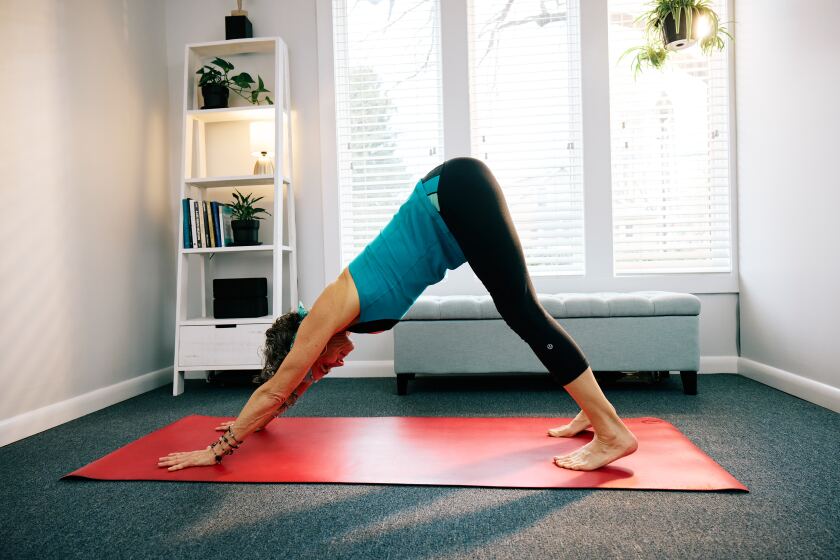
Downward Facing Dog:
Downward dog is one of the most easily accessible poses for most bodies. Whether your hands are on a counter, sofa or the floor, this pose feels fabulous. It just may be the most effective way to best help you strengthen and stretch, both at the same time.
Benefits: It may stimulate circulation, improve flexibility along the spine, strengthen the upper body, and stretch the lower back and hamstrings.
How To: Start in a tabletop position on all fours (hands and knees), then tuck the toes and lift your knees off the floor. Keep a bend in your knees and tilt your pelvis so your tailbone points high to the sky. Drop your head and lean back so you feel your chest moving toward your thighs. Breathe normally and naturally for three to 10 breaths.
Personalize It: Hands can be placed on the counter, sofa or the floor.
Transition: If your hands are on the floor, lower your knees slowly to return to a tabletop position. Move to a seated position to rest before moving on to the next pose. If your hands are on the counter or sofa, walk your feet in slowly, then bend your knees to slowly move upright. If you feel light-headed, sit immediately and breathe normally and naturally to allow your body to find its balance.
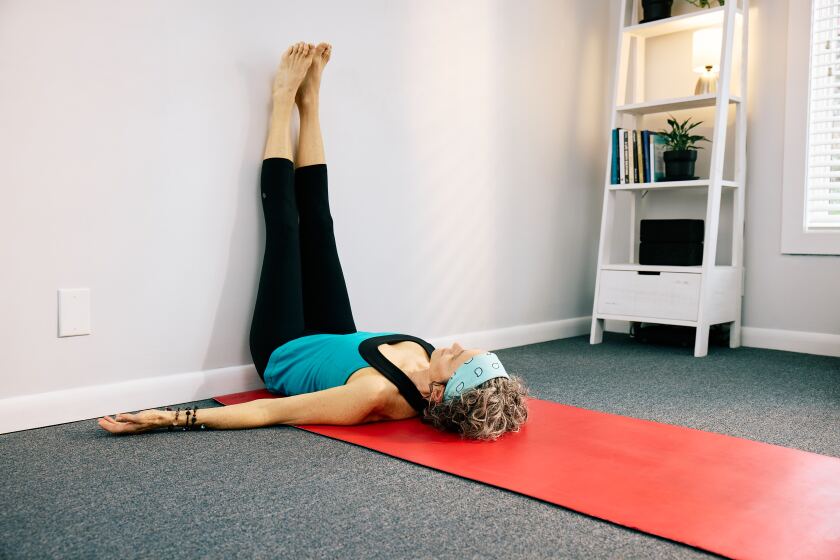
Legs-Up-The-Wall Pose:
This just may be the most calming place you’ll ever be. Whether your legs are resting on the wall, a chair or the sofa, this pose can make you feel like new. No need for an hour-long nap when you can spend 20 minutes in this legs-up-the-wall pose.
Benefits: It may stimulate circulation, calm the mind, stretch hamstrings, cultivate relaxation, reduce pain, improve blood flow to major organs, and relax the thoracic cavity to create more space for deeper breathing.
How To: Lie on the floor on your side in a fetal position with your knees bent and your butt near the baseboard. Scoot your feet up the wall as you roll onto your back. Bring a pillow or small folded blanket under your head. Rest your arms to your sides (or hands on your lower abdomen). Set your timer (20 minutes is perfect), close your eyes and breathe.
Personalize It: Pose can be practiced on your bed, aka legs-up-the-headboard.
Transition: After the timer sounds, exit the pose the same way you entered: scoot your feet down the wall, bend your knees and roll to your side. Pause to allow your body to find its balance. Push slowly with strong arms up to a seated position. Pause again, breathe naturally for about 10 breaths, then gently transition to the next pose.
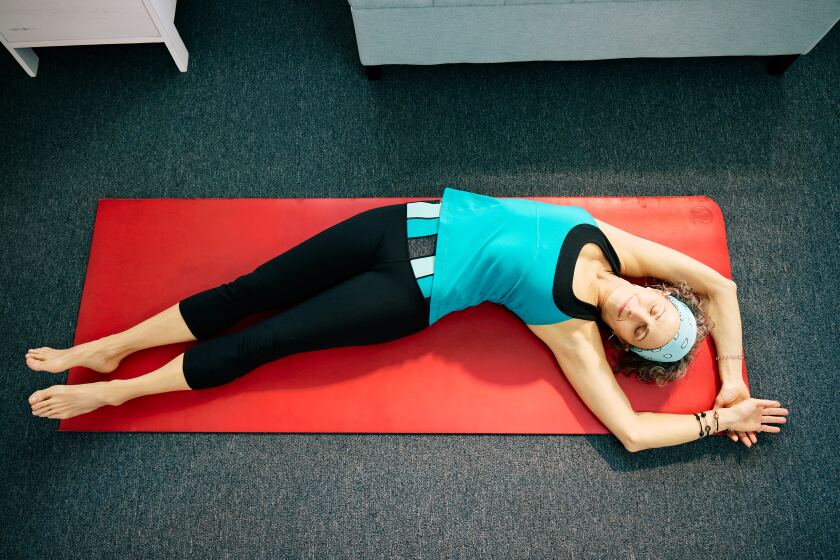
Supine Crescent Moon:
This restorative pose can help you move with more ease through your daily activities. Here’s why: It stretches your iliopsoas muscle and hydrates the deep connective tissues around it. The iliopsoas (or psoas, for short) is a big muscle that originates at the lower spine, wraps around the tops of the hip bones and attaches deep in the groin. If you struggle with back or pelvic pain, it may be a result of tightness in this muscle. When you practice the supine crescent moon pose for just three minutes per day, you’ll feel deep relief in the body, thus improving your mobility and range of motion.
Benefits: It may hydrate deep connective tissue, stimulate circulation and stretch the core and hip flexors. It may also help reduce back and pelvic pain.
How To: Move onto your back on the floor or your bed. With feet flat and knees bent, wiggle head and shoulders a bit to the left so you feel a bend on your right side, then slide feet (one at a time) toward the left so the legs lay long and reach arms out to the sides (or up in a V) with palms up. Set your timer for three minutes, close your eyes and breathe.
Personalize It: Take care not to bend into the pose too far too fast. However, if you’re seeking more sensation for a deeper stretch in the pose, bring one ankle to rest over the other. If your feet are toward the left corner of the mat, bring the left ankle to rest over the right. Conversely, when feet are toward the right corner of the mat, bring the right ankle to rest over the left.
Transition: After the timer sounds, exit the pose the same way you entered: bring your arms back to your sides, slowly bring one foot flat with your knee bent (then the other), and wiggle your head and shoulders back to neutral. Pause for 10 breaths and then take the pose on the other side.
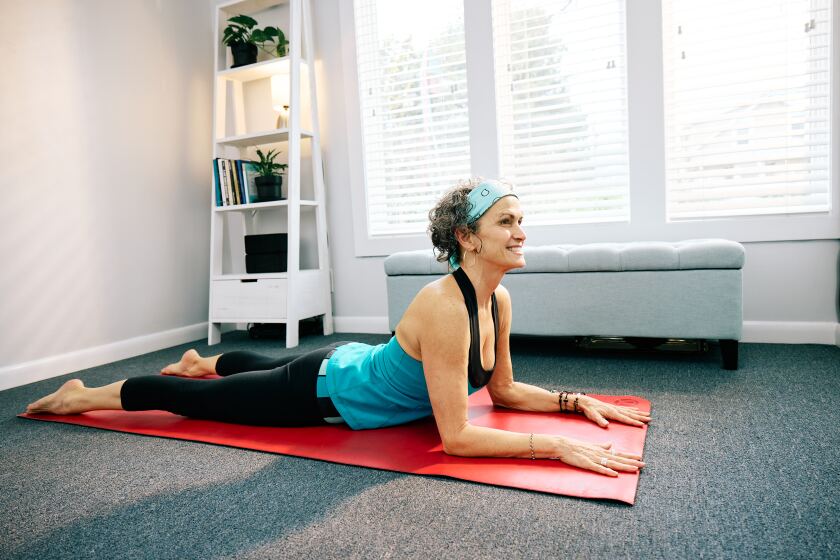
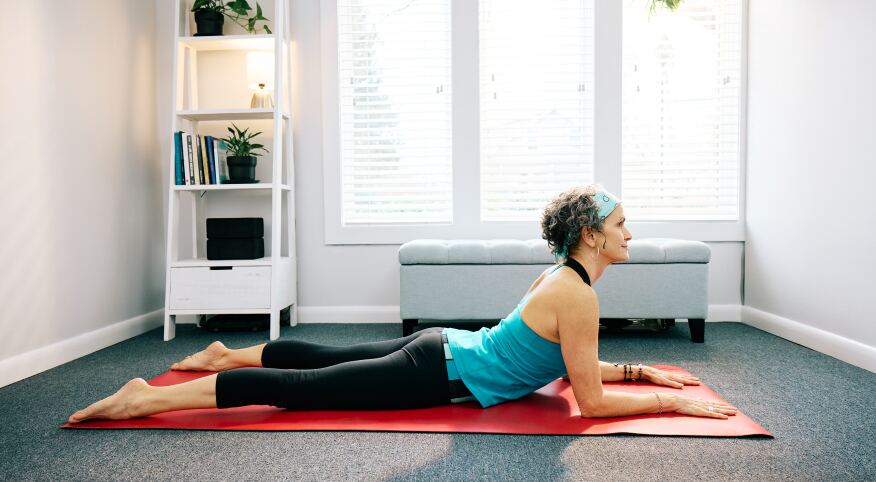
Sphinx Pose:
If you look at my daily to-do list, you’ll find Sphinx Pose written right at the top! Between yoga sessions, I tend to sit a lot. But by doing this, I’m jeopardizing the integrity of my spine which then disrupts the stability of my entire body.
When we sit, we often move away from a stable neutral position as we slide slowly into a slouch. This rounding of the lower back causes a posterior pelvic tuck that negatively affects our posture, often causing pain and/or injury. I consider my time in Sphinx as an opportunity to undo any damage I do while sitting.
Benefits: It may improve flexibility in the lower spine, stimulate digestion and elimination, release tension in your deep core and help to stabilize pelvic floor muscles.
How To: From hands and knees, lower onto the elbows, walk the knees back and lower the hips to the floor. Elbows are tight to the chest, unless there is pain in the back, move the elbows wide to lower down. Relax the glutes (muscles in the bum), the lower back and the pelvic floor. If it will feel more supportive, bring a folded blanket under the lower belly and pelvis. Set your three-minute timer, close your eyes and breathe.
Personalize It: This pose can be practiced on your bed. Your feet can be close together or wide apart.
Transition: After the timer sounds, move your elbows out, lower down to your chest for three breaths, then roll onto your side to a fetal position. Pause for three breaths to allow your body to find its balance. Push slowly with strong arms up to a seated position. Pause again.
Now relax into spring in your own home with these poses. With the gentle practice of yoga, we can cultivate a renewed sense of vitality and ability to feel, and flow, with the beauty of the season.
How many of you have tried yoga? Do you enjoy it? Let us know in the comments below.
